 Vini Studio
Your image is ready. You know how the scene should develop after that frame. But you face another list of models: which one accepts this material, where is the right mode, and why does one name have several versions? We changed the order of that decision and moved the essentials to the top of the Video node.
Choose a familiar model, open its settings, then find out whether it can do the job.
Name the task, see the available models for it, then configure the next run.
“What do you want to do?” is a better first question
The selector has eight roles, from creating with a description to working on an existing video. Recast characters replaces performers in the original scene; Avatar transfers motion to the character in an image. The tasks below follow the menu order; choose one to jump to its walkthrough.
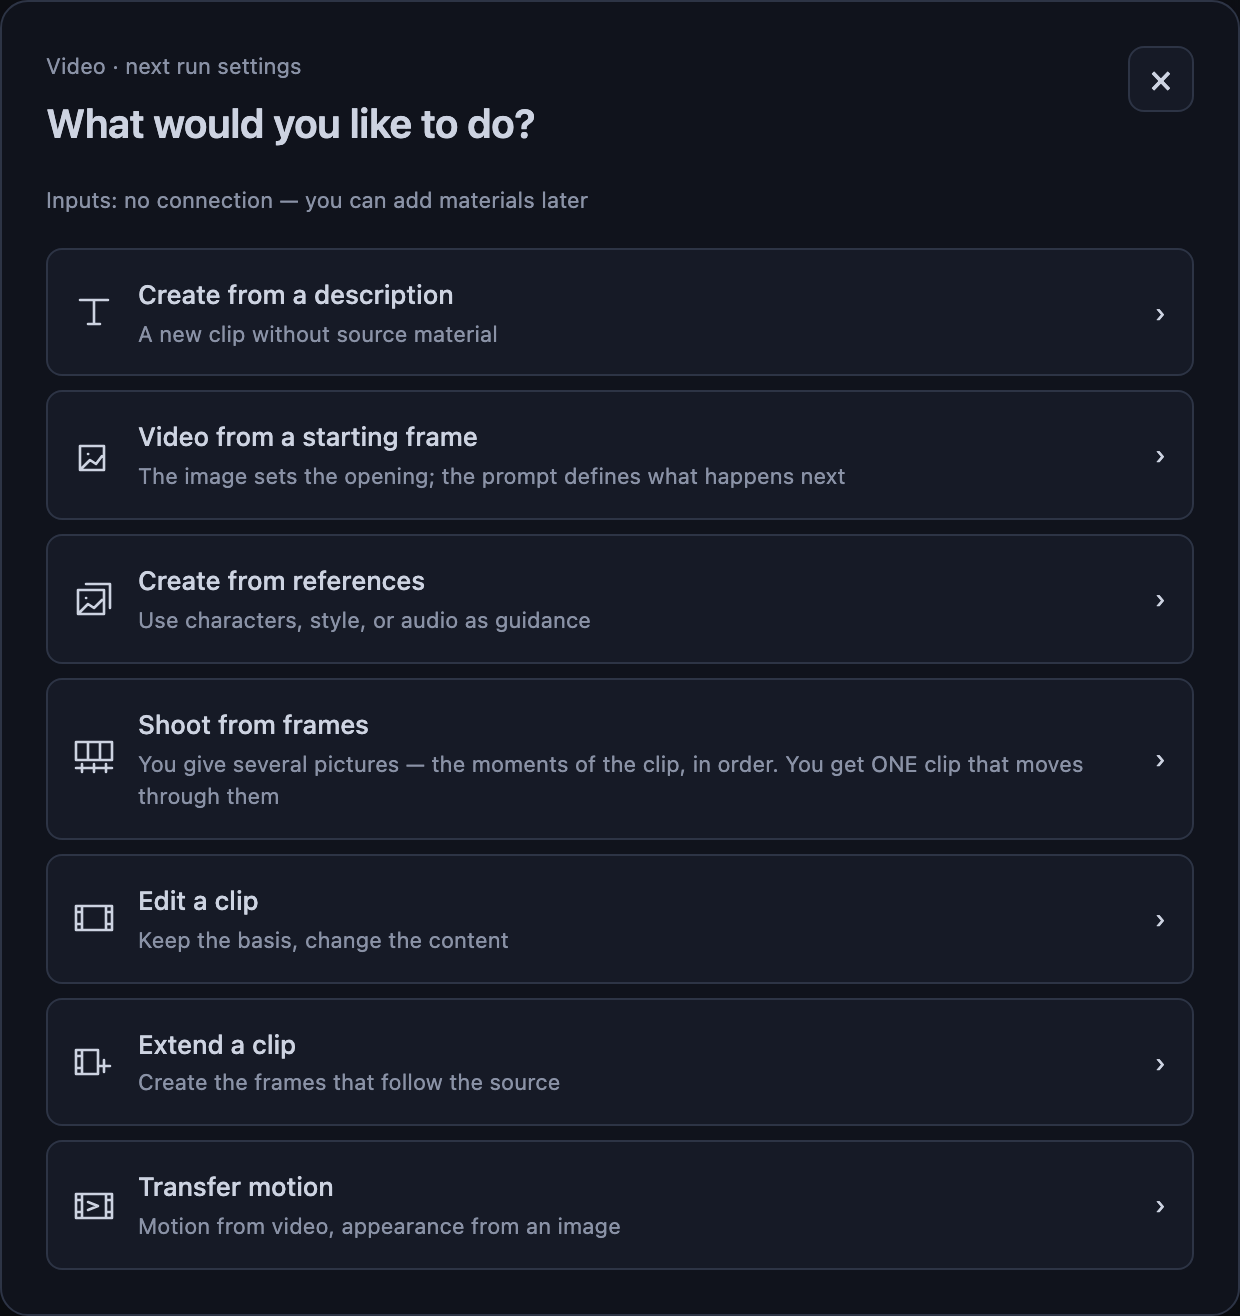
The interface screenshots were captured in the local studio using a sample project. These are working menus and a real node, not a drawn mockup.
Compatible models first. Explanations for the rest
After you choose a role, models are ordered by support for that operation and the type of material connected. Matches come first. Other models available to your account stay visible, with a reason why they do not fit this choice, such as an unsupported operation or an input that this role does not use.
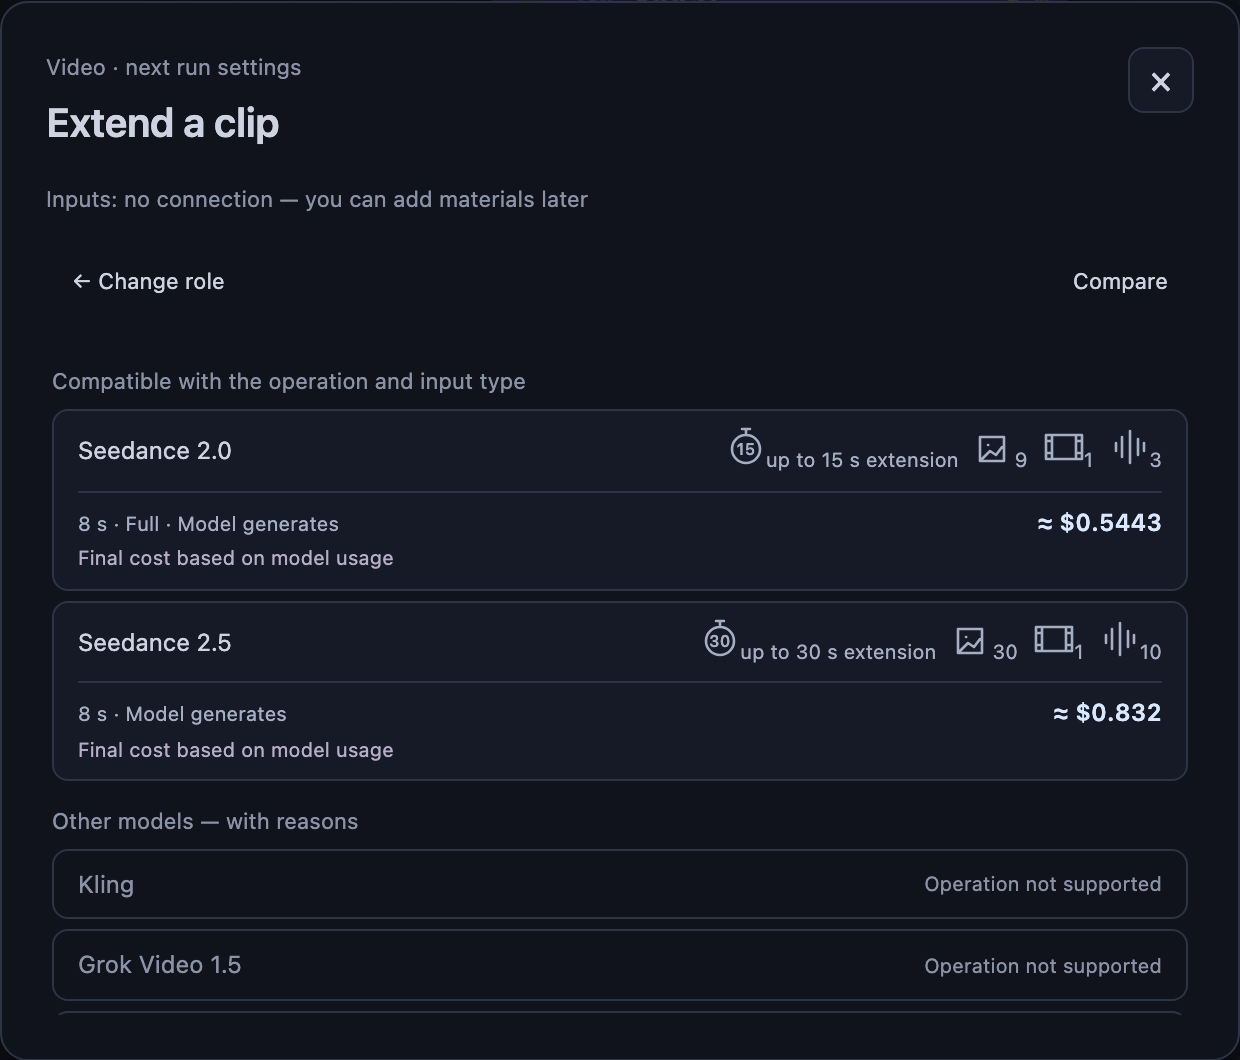
Fewer lines on the node. More useful information at a glance
The role sits beside your node’s name, with the model and current settings below it. Explicitly choosing a role also adjusts its inputs: Create from a description keeps scene and prompt. Unused empty inputs disappear; materials already connected stay connected when you change the role.
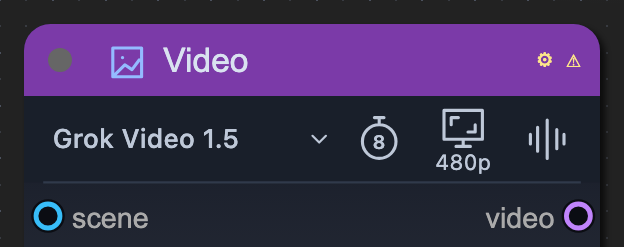
- Role icon
- Click to choose a different action.
- Model name
- Opens the models for the current role.
- Timer and other icons
- Open a specific setting: duration, resolution, variant, or audio, where supported by the model.
The selected duration is not the model’s limit
The node screenshot has eight seconds selected. For video from a starting frame, Grok Video 1.5 supports up to 15 seconds, while Seedance 2.5 supports up to 30. Click Compare and select up to three models to see the difference. The view shows available information about maximum duration, resolution, and inputs for the chosen role and variant.
A variant is not a universal quality score. Seedance 2.0, for example, offers Draft, Fast, and Full; FLUX 3 generation offers Draft and Full. FLUX 3 Draft has a fixed 720p output. Changing the variant can change the available settings; matching variant names do not make different models equivalent.
Seconds mean different things too: for generation, the length of the new clip; for editing, possibly “same as source video”; for extension, the length of the added segment, not the whole film. Resolution sets frame size, while a variant selects a version within a model. Fixed parameters do not get a separate selection button in the compact header.
The estimated cost of the selected run now appears in the selector and updates when settings change. The RU badge is the owner’s listening assessment of Russian speech, not a pronunciation guarantee for every clip.
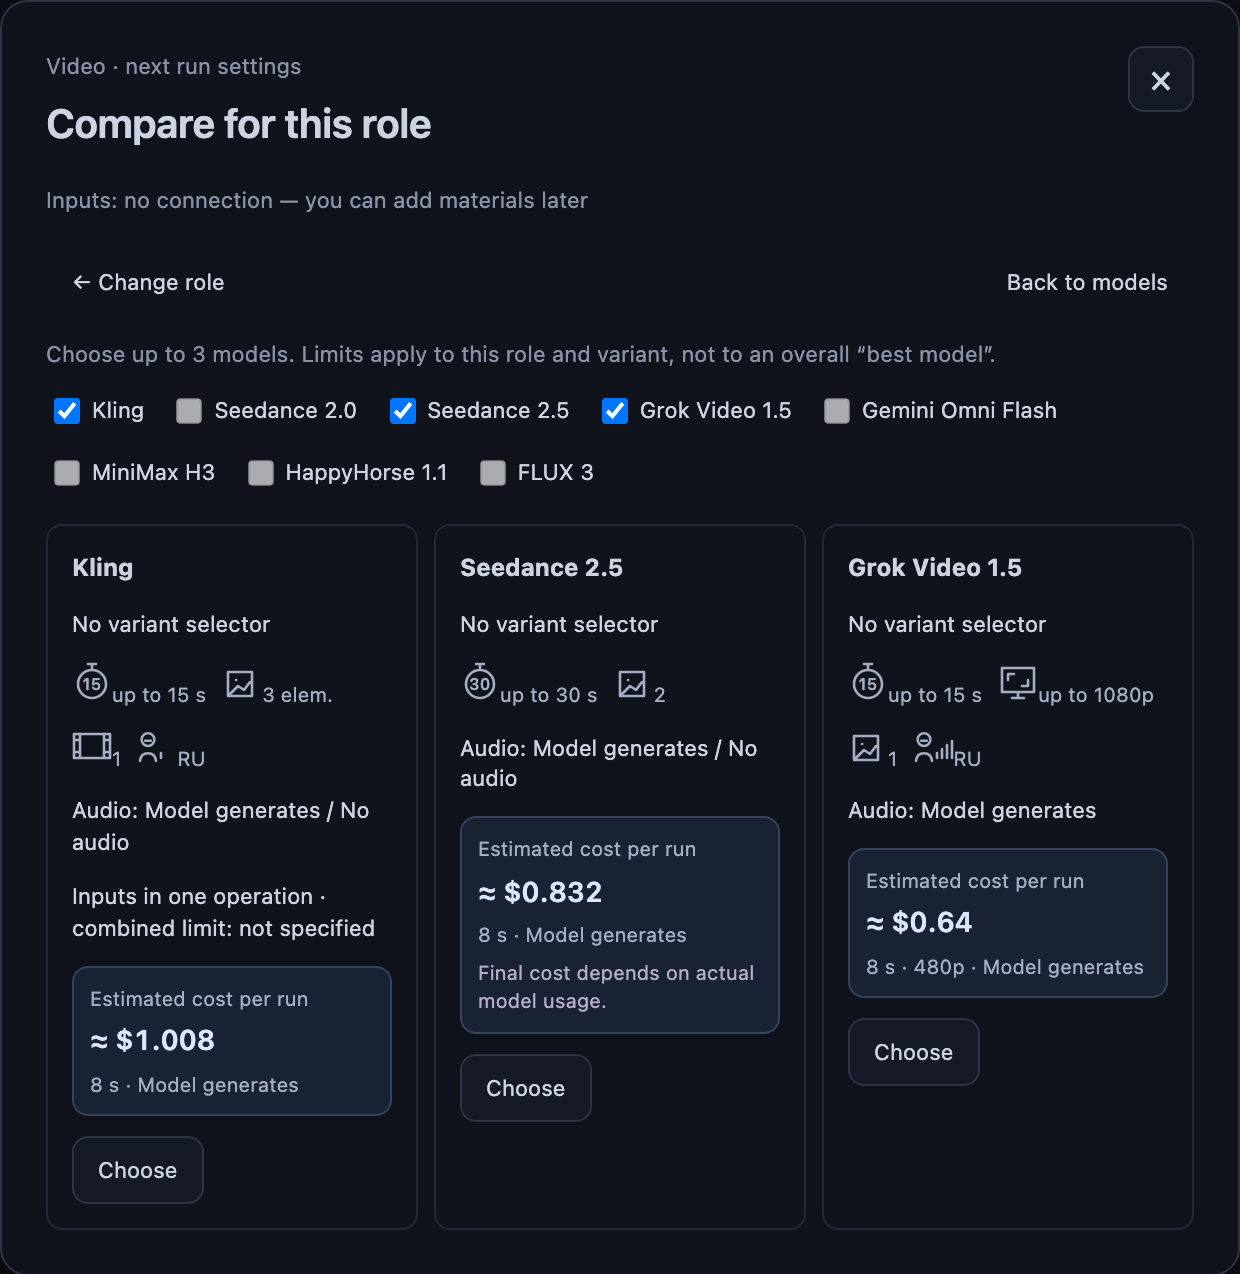
On the node: what I chose. In comparison: what I can choose.
Every role, explained through a task
Each walkthrough tells you what to connect, which role to choose, and what result to request. The images and clips come from our earlier projects, not a new model benchmark. The prompts are separate examples of intent, not promises to reproduce the shown results.
01Only have an idea? Create from scratch
- What to connect
- A text description only
- What you get
- A new clip without source images or video
Choose “Create from a description”: this is text-to-video. No image, video, or audio input is needed; the prompt defines the scene. Use it for a new shot that does not need to begin with a particular image. If matching an existing character matters, use references instead.
Wide shot of an abandoned greenhouse at dawn. Enormous leaves grow between glass panels. The camera moves slowly along the aisle; dust floats in the shafts of sunlight. No people or speech.
02Your image defines the first frame of the video
- What to connect
- A starting image + what happens next
- What you get
- A clip that starts from your frame
Choose “Video from a starting frame”: this is image-to-video. Connect the image to the first-frame input, then choose a model and duration. The image sets the initial scene; the prompt describes what happens next: a character’s actions, a developing scene, a transformation, or camera movement. Simply animating a picture is one possible use, not the definition of the role.
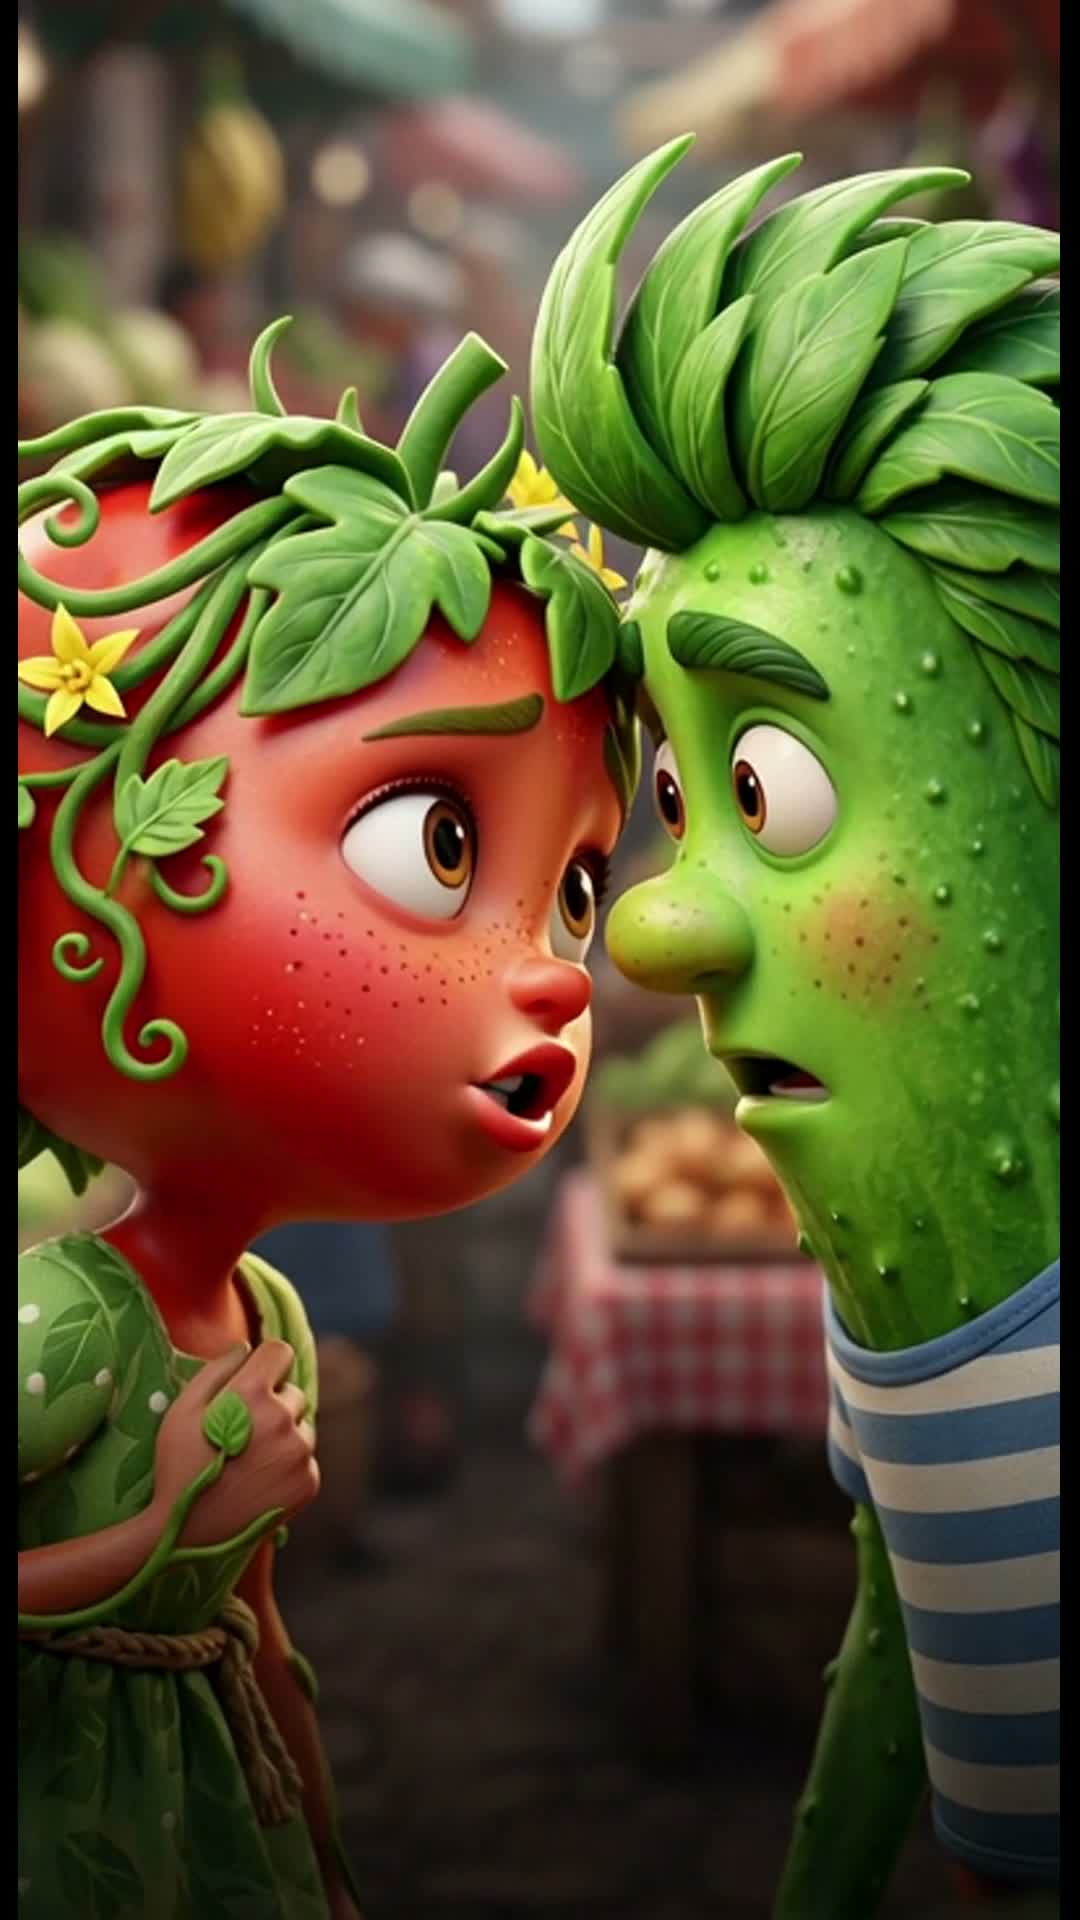
The camera slowly pushes in. The cucumber tilts his head slightly toward the tomato; she shifts her gaze toward him. Preserve the composition and soft lighting. No dialogue.
Not one frame, but an opening and an ending
In the same Video from a starting frame role, choose a model that supports a last frame, such as Seedance 2.5. The first image sets the opening; the second sets where the scene should arrive. Connect them to the “first frame” and “final frame” inputs, then describe the transition. These are endpoints, not simply two character references.
Example: first and last frame →03You have a character and an object and need a new scene
- What to connect
- Character, object, motion, or audio references + a prompt
- What you get
- A new scene guided by the chosen references
Choose “Create from references”: this is reference-to-video. These images do not have to become the opening frame: they guide who or what should appear in a new scene. Connect the materials you need and give each a clear job in the prompt.
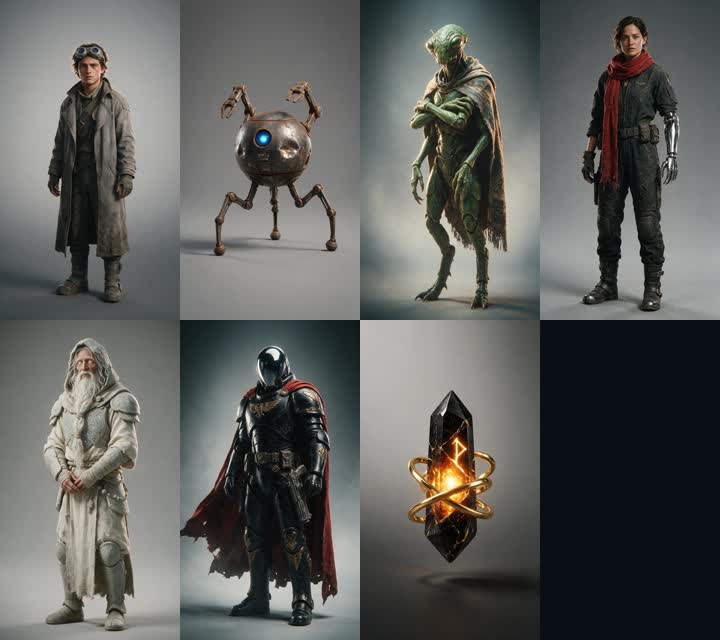
Use the selected character’s reference for their appearance, and the Key image for the artifact’s shape. The character notices the Key on a table; the camera racks focus from the face to the object. Do not add the other characters to the shot.
Image + video + audio, in one run
Seedance 2.5 accepts all three together under Create from references: an image guides the character or object, a clip guides motion or atmosphere, and audio provides a sound reference. This is one combined operation, not three generations in sequence. Input video and audio share a 30-second total budget; that is separate from output duration. Explain each file’s purpose in the prompt; the new shot does not have to reproduce a frame from the reference clip.
Use the image for the Key’s shape, the video for the slow camera push-in and drifting smoke, and the audio for rhythm and atmosphere. Create a new shot of the Key floating above a wrecked starship. Do not copy characters from the reference clip. No speech.
Only have audio: can you still create a video?
Yes: choose Seedance 2.5 and Create from references, connect the audio, and describe the visuals. This operation does not require an image or a video. Seedance 2.0 is different: you must add an image or video alongside the audio. Here, audio-to-video is a use of the references role, not a separate button available for every model.
Create visuals for the audio reference: glowing waves travel across a dark lake, their movement following the music’s rhythm. One continuous shot, without characters or speech.
04Your plan is already broken into frames: make one clip
- What to connect
- Several frames in order — one storyboard sheet, or key frames each pinned to its own second
- What you get
- A single clip that follows those frames
Choose Shoot from frames when you know several successive moments of the video: she opens the door, pauses on the threshold, then steps inside. You request one clip following that sequence. How to prepare the images depends on the model; the selector explains the difference before you run.
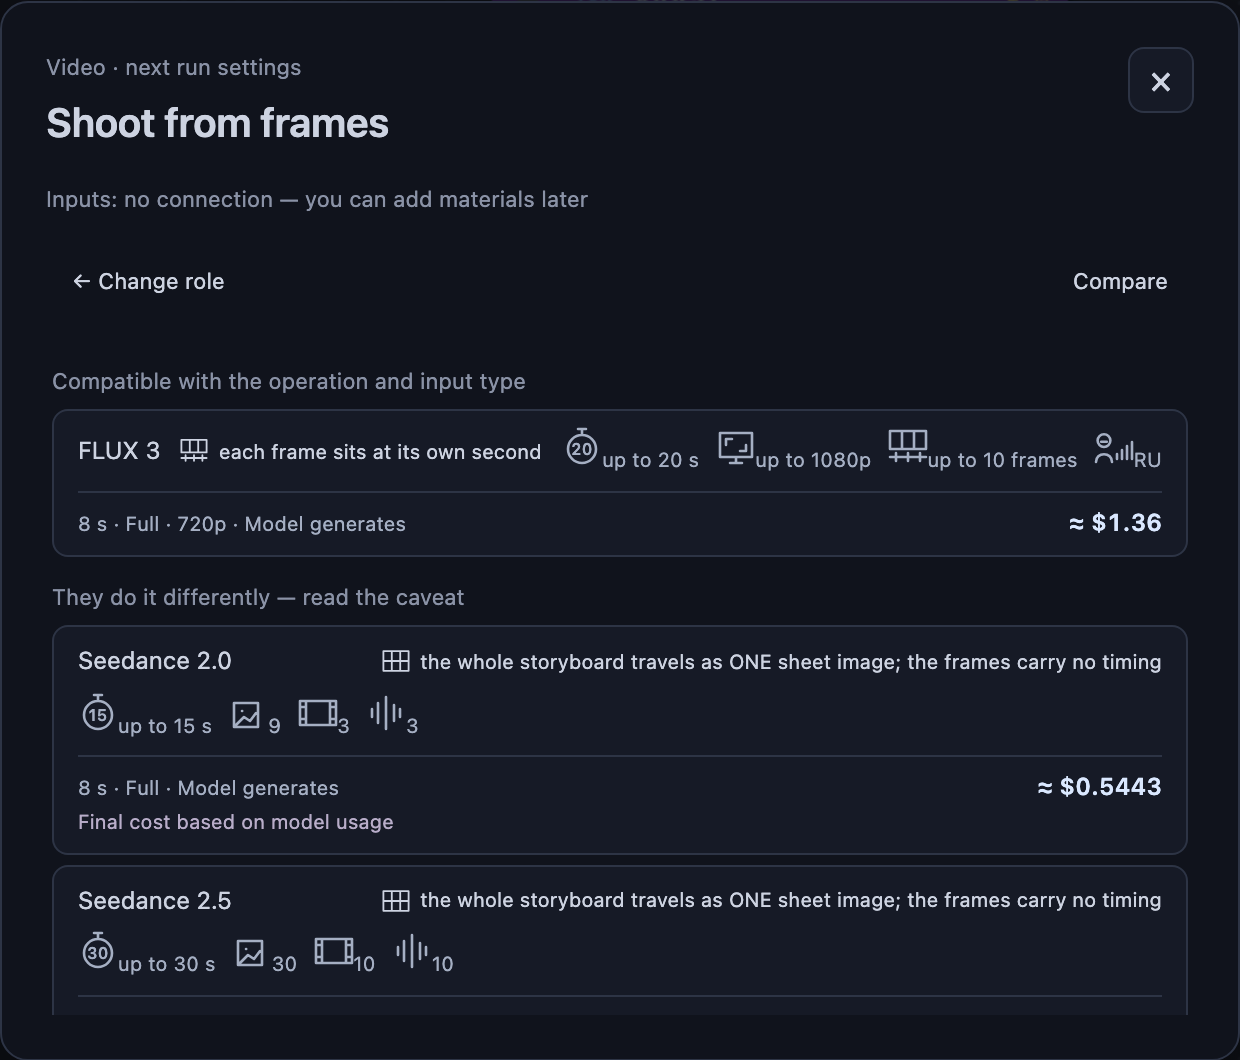
Need to control the middle of the clip too?
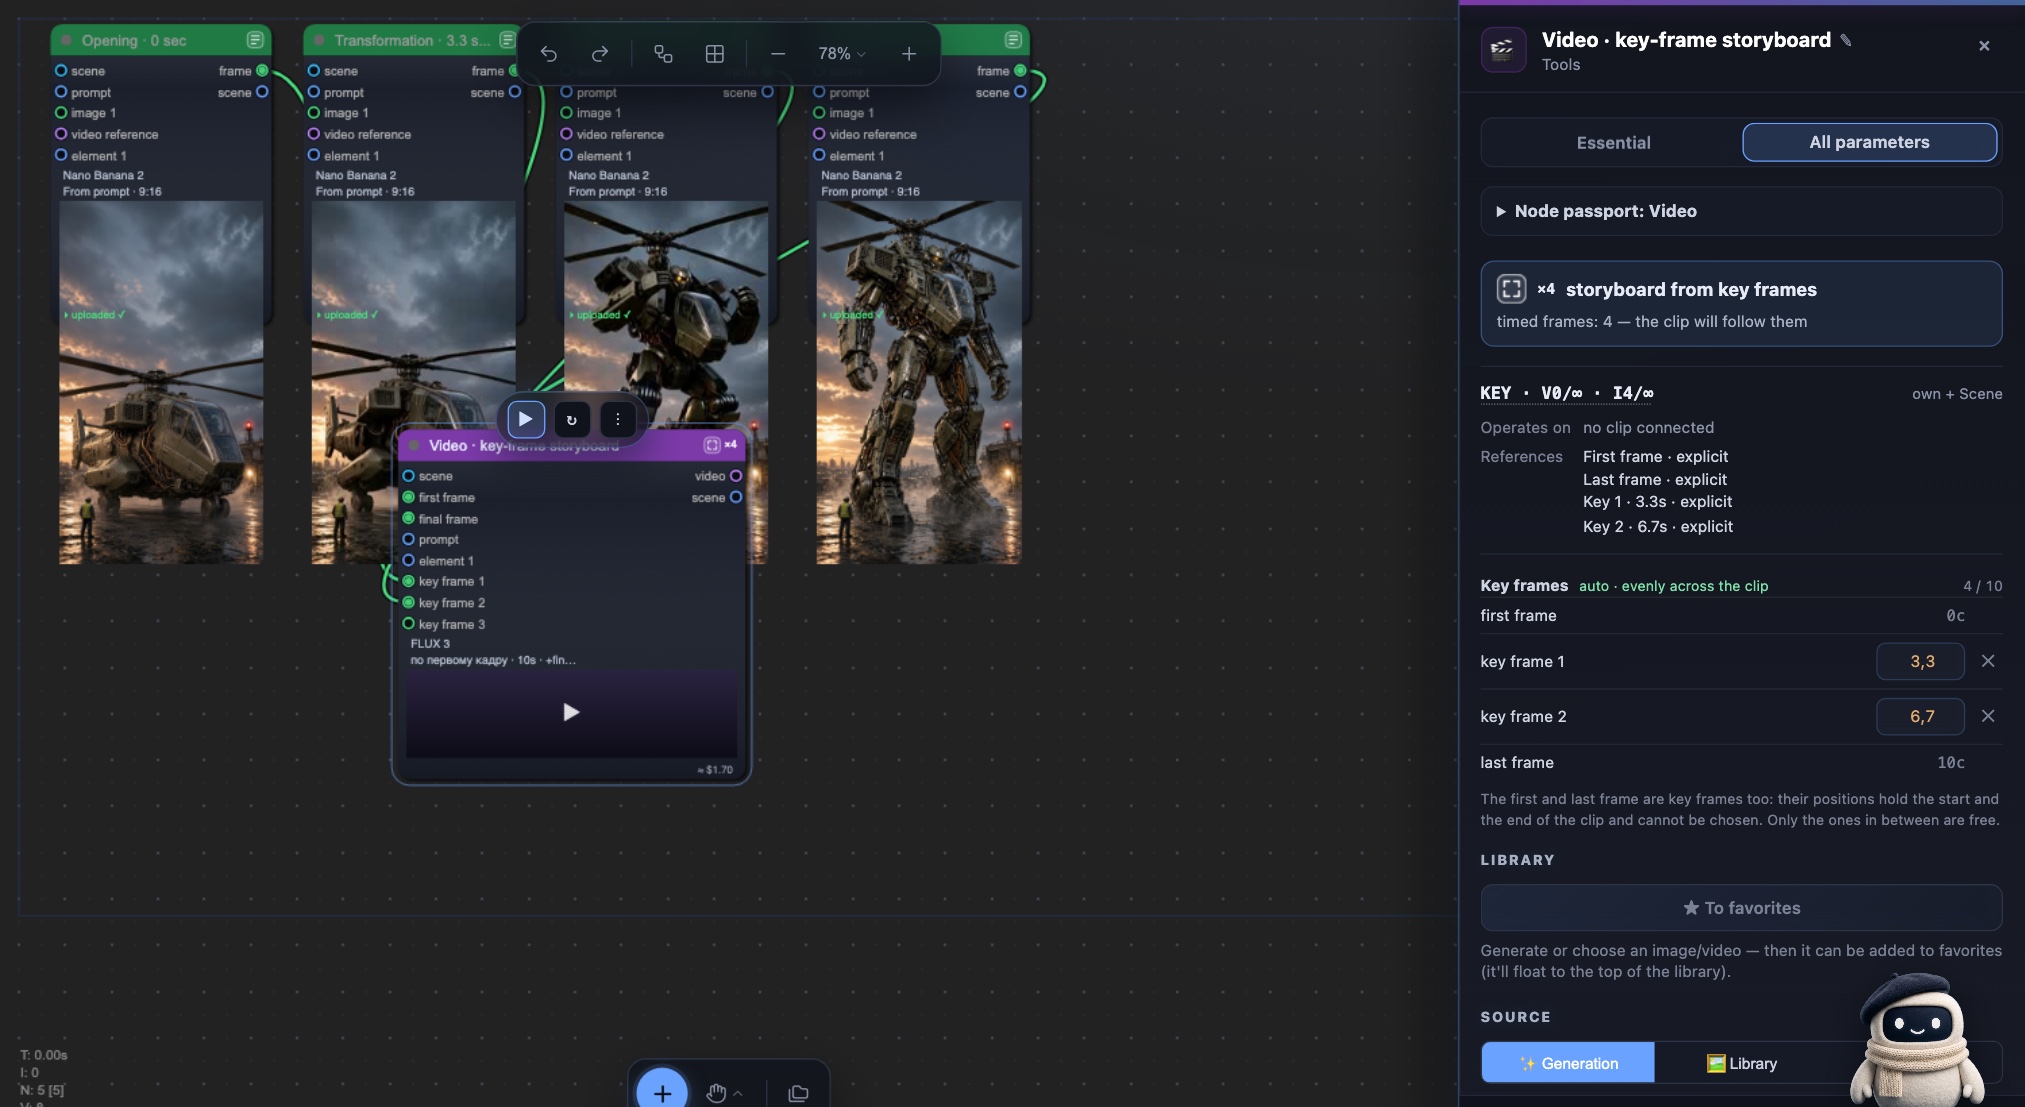
Choose FLUX 3 under Shoot from frames. Connect the opening image to first frame, intermediate images to “key frame” inputs, and an ending image to “final frame” if needed. Set times for intermediate points: a helicopter at the opening, the transformation at three seconds, and a robot at the end. Up to 10 frames are supported, including the first and last. These are timed visual targets, not a collection of character appearances.
You have a finished storyboard sheet
For Seedance 2.0, Seedance 2.5, Grok, and other models with reference inputs, prepare one image containing the panels in order and connect it to an element input. You can use the Storyboard Sheet generator from the library. Ask the prompt to follow the panels in sequence. Panels have no individual timestamps; connecting several images does not automatically assemble them into a sheet.
Kling needs a starting frame alongside the sheet
Connect the storyboard sheet to an element input and supply the required first frame separately. The sheet takes one Element slot. The starting image defines the opening, and the sheet guides the following moments; individual panels cannot be pinned to a second here.
Follow the storyboard frames in order: she opens the door, pauses on the threshold, steps inside. One continuous shot, no cuts, no on-screen text.
05You like the clip and want to change one detail
- What to connect
- An existing clip + a description of changes
- What you get
- An edited version of that shot
Choose Edit a clip and connect the source video. Start the prompt with the change, then specify what should stay. You do not need to choose new-video generation just because you recognize the model’s name.
Replace the logo on the character’s faceplate with Vini Studio. Preserve the character, car, camera movement, and confetti. Do not change the sign in the background.
Find the materials and details in Seedance 2.5: references and video editing.
06The clip ends too soon: shoot what happens next
- What to connect
- An existing clip + what should happen next
- What you get
- A continuation after the source clip ends
Choose “Extend a clip”, connect the source video, and choose a model that supports this operation, such as Seedance 2.5. Describe what happens after the clip’s final moment. Duration describes the new continuation: five seconds means five more seconds of action, not shortening the source to five.
Continue events after the end of the source video. Preserve the camera’s direction, lighting, and rain. The character gives a small wave, then the camera settles on a medium shot. Do not restart the scene. No speech.
07The same clip, different people in it
- What to connect
- A finished clip + one photo per new person (up to 4)
- What you get
- The same clip with the same shots and sound, people replaced
Choose MiniMax H3 and “Recast characters”. Connect a finished clip of 5 to 30 seconds and one photo per new person — up to four, ordered left to right as people stand in the frame. Background, motion, cuts and sound come from the source; only the people change. For example, two rappers in a music video become a tomato and a potato while the scene and rhythm stay the same.
The person on the left becomes the character from the first photo, the person on the right the character from the second. Keep everything else as in the source clip.
08Keep the movements, use a different character
- What to connect
- A character image + a clip with the desired movements
- What you get
- Appearance and setting from the image, actions from the clip
Choose Avatar: the role includes Kling, MiniMax H3 and DreamActor 2. Connect the desired character image as the first frame and a movement clip as the source video. The image supplies the appearance and setting; the clip supplies the actions. DreamActor needs no text prompt.
Use the image for the character and environment. Transfer the character’s actions from the motion clip while preserving the image character’s appearance and clothing.
Try it on your canvas
- Add Video using “+”, or drag a wire from source material into empty canvas space and choose Video.
- Choose a role, then a model. Open comparison here without leaving your canvas.
- Review duration, variant, resolution, and audio. Available controls depend on the chosen operation.
- Create the node or apply the selection to an existing one. Review its inputs and cost estimate before running.
When creating from a wire, you still choose the role. The selector then uses the material type to order models; it does not automatically guess the task.
The update is available to all studio users. The models have not become identical, and we have not started choosing for you. Their differences are now presented in terms of what you want to do.
Create videos in Vini Studio
Ideas, characters, scenes, sound and editing in one project. Work independently or discuss content production with our team.
Get started in the studio →Sign in with Telegram or Google. No account needed in advance — it is created for you.